Cameras
The Cameras section — in the Scene tab of Studio's left panel — defines the starting camera for your published splat: the view a visitor lands on when they open your scene page (unless the scene plays its camera animation on open instead). The camera has a position, a target (the point it looks at), and a field of view.
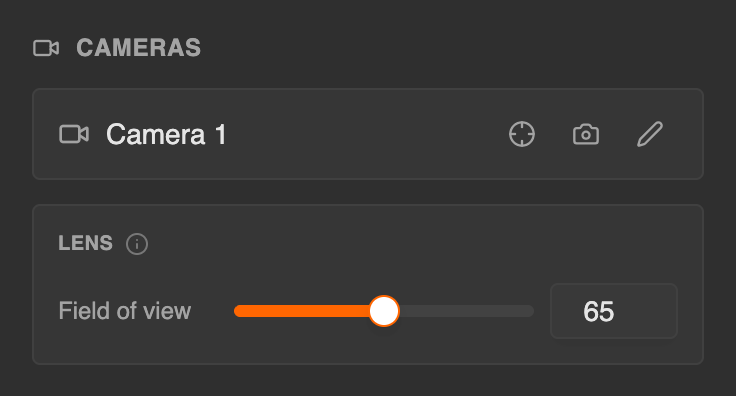
Studio currently supports a single camera. Support for multiple cameras is coming.
Setting the camera
The camera is listed as Camera 1 with three icon buttons:
- Go to camera — flies the viewport to the camera's saved pose.
- Set camera to current view — stores the viewport's current position, target and field of view as the starting pose in one click.
- Edit camera (pencil) — opens camera edit mode to frame a new starting view. The pencil turns yellow while edit mode is active.
You set the camera's position and target by framing the viewport. There are no numeric position or target inputs in the Cameras section.
Edit camera mode
- Click Edit (the pencil) in the Cameras panel. Studio enters camera edit mode: the viewport flies to the camera's saved pose, a thick yellow border frames the viewport, and a Camera Edit Mode badge appears at the top left, with Apply and Cancel buttons beside it.
- Orbit, pan, and zoom the viewport to frame the shot (see Camera Controls for navigation).
- Click Apply to save the viewport's position, target (look-at point), and field of view as Camera 1's stored start pose, then exit edit mode.
- Click Cancel to exit without saving; the viewport returns to the last saved pose.
While framing, double-click a point on the splat to set it as the focal point — the point the camera orbits around. The view smoothly re-centres on that point without moving the camera's position. Double-clicking empty space has no effect.
Click Edit again (or press Esc) to exit edit mode without saving. Unlike Cancel, the viewport is not restored — only the stored pose stays unchanged.
Lens (field of view)
Below the camera list, the Lens control sets the Field of view with a slider and a numeric input, in whole degrees from 10° to 120° (default 75°). The value is the full viewing angle, not a half-angle. On a wide viewport the angle is measured horizontally (left to right); on a tall viewport it is measured vertically (top to bottom). You store one number — Studio and the published scene page apply it to whichever axis suits the screen shape.
This is a single, global setting: as its tooltip says, it applies to the start camera and all annotation cameras.
Defaults
A fresh scene starts with a single camera at a 75° field of view, with position and target chosen for the scene type:
- Environment-style scenes — position
[0, 2, 0], target[2, 2, 0]. - Object-style scenes — position
[2, 2, -2], target[0, 0, 0].
Frame the viewport and click Set camera to current view, or use camera edit mode and click Apply, to capture a new pose, then adjust the Lens field of view so the scene looks the way you want visitors to see it on first load.
How cameras are used
- Initial framing — the first camera in the list is the default starting view when a visitor opens the scene page (
startMode: 'default'). From there the viewer plays a slow, looping camera motion until the visitor takes over: an orbit around the target when the camera starts outside the splat (an object), or a gentle figure-eight when it starts inside (a scene). A camera animation replaces that motion when Play animation on open is on. - Object or scene — whether the camera starts outside or inside the splat's bounds also decides the viewer's starting camera mode (orbit for an object, walk or fly for a scene) and how the splat is presented in VR and AR.
- Annotation poses — each annotation embeds its own camera pose that the viewer animates to when the annotation is selected. The annotation's pose is independent of the entries in the Cameras list.
See also
- Camera Animation — keyframed camera motion on Studio's timeline
- Annotations — 3D-positioned hotspots that can adopt a camera pose
- Experience Settings — the JSON contract that stores the camera list